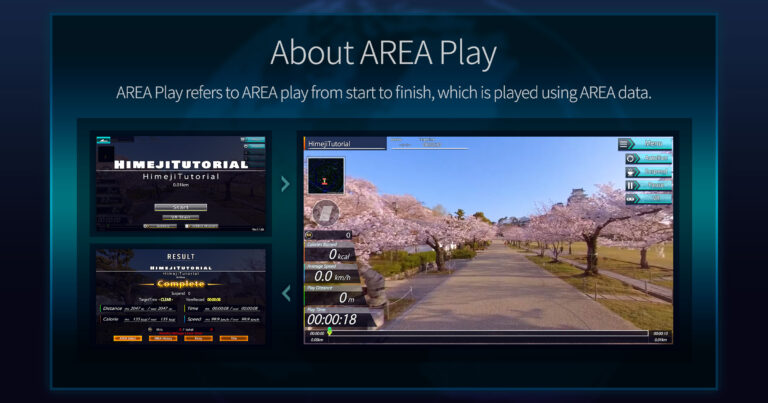
AREA Play refers to the entire process of playing with AREA data, which is the main feature of EASYTRIP, from the start to the end of the play. AREA Play begins after selecting an AREA in AREA SELECT. It is divided into three main phases.
AREA Play Start Screen: This is the confirmation screen before actually starting the play of an AREA. You can confirm the AREA you are about to play, select VR mode, adjust settings, and check the play history of the AREA.
AREA Play Screen: This screen is displayed while playing an AREA. During AREA Play, you can do various things such as checking your current location on the MiniMap and changing settings, in addition to real-time display of play results.
AREA Play Result Screen: This screen is displayed when you clear or finish playing an AREA. You can check the play result data and history, and post to SNS.
A single play cycle goes: AREA Play Start > AREA Play > AREA Play Result.
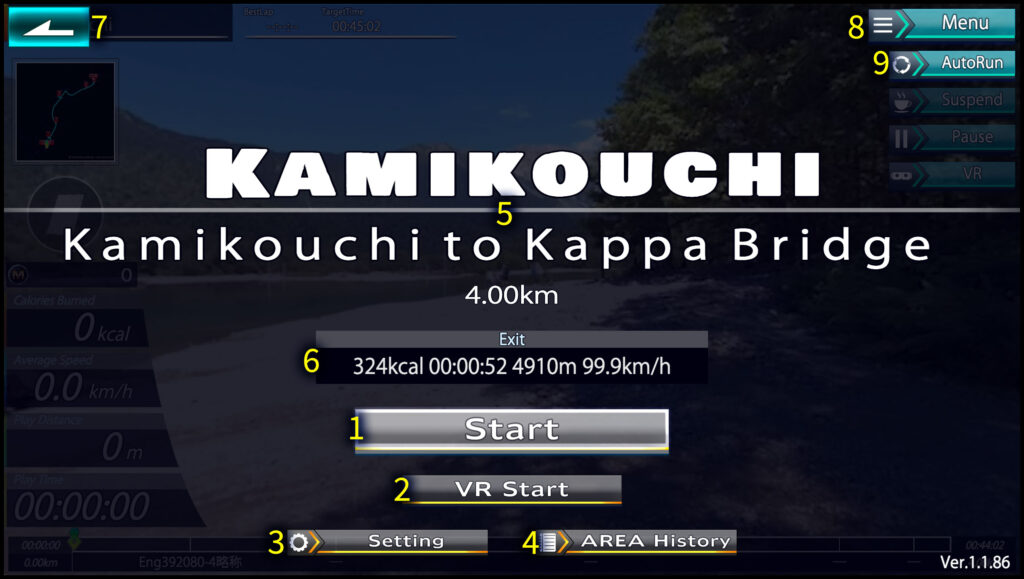
Descriptions corresponding to the numbers displayed on the AREA Play Start screen are as follows:
AREA Play Start Screen
1. Start (Button): Press to start playing the AREA.
2.VR Start (Button): Press to start playing in VR mode.
3. Setting (Button): Press to adjust various settings related to play.
4. AREA History (Button): You can check the past history of the selected AREA.
5. Name of AREA (Information): The top shows the name of the AREA (common alphabetical notation), and the bottom shows the name of the AREA (language-specific notation). At the very bottom, the approximate real-world distance set for this AREA’s data is displayed.
6. Last Play Result (Information): Displays the result of the last play.
7. Back (Button): Returns to the AREA SELECT screen.
8. Menu (Button): Press to choose between AREA History, Settings, Suspend, Retry, and Exit.
9. AutoRun (Button): Press to enter AutoRun mode, a mode that continues to play without the need for physical activity.
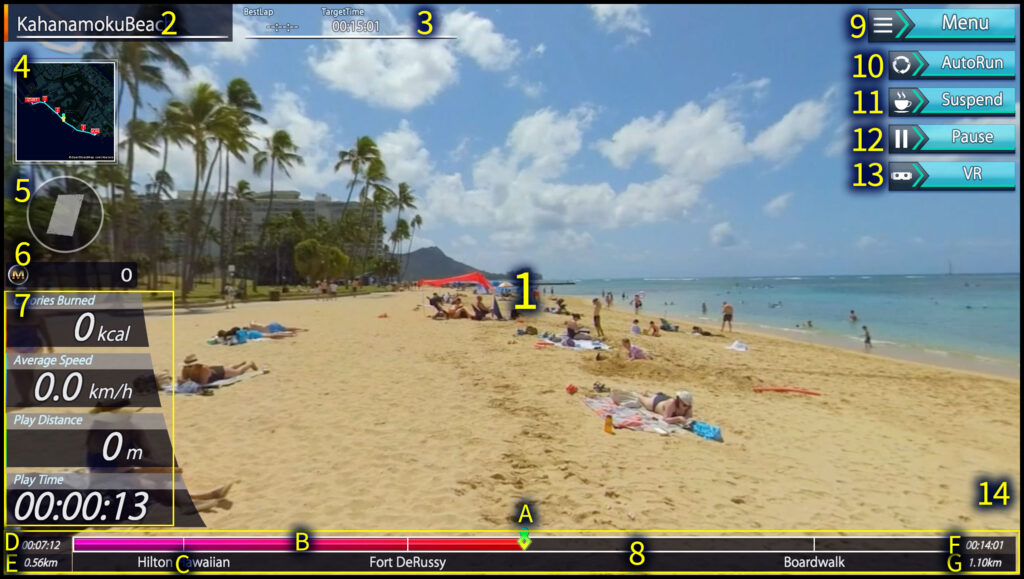
The description corresponding to the number of the image displayed on the AREA Play screen is shown below.
About the AREA Play Screen
1. AREA Footage (Touch Area): 360-degree panoramic footage is displayed. On smartphones, you can swipe to change the camera viewpoint. The viewpoint can also be changed using a controller or AppleWatch.
2. AREA Name (Information): Displays the name of the AREA in a common alphabetical notation.
3. AREA Information: Displays three pieces of information – BestLap, which is the best time achieved in a cleared play; TargetTime, which is the target time for clearing when playing an AREA to the end; and whether it has been cleared or not.
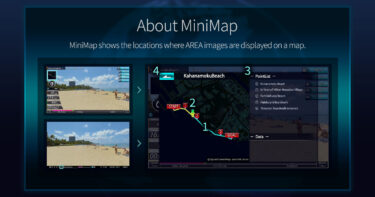
4.MiniMap (Button): You can check your current location, the entire route, and the path traveled on the map. Pressing it will display a popup, and you can move to a set point. Details are described on a separate page.
5.Calorie Consumption Icon (Information): This icon indicates how much calorie consumption equates to in terms of food. The display intensifies from bottom to top, and when it’s fully intense, it equates to the calorie consumption of the displayed food item, after which the next icon appears.
6.Earned Mileage (Information): Displays the Mileage earned in the current play. The icon changes according to the grade of the SupporterCard, and the efficiency of earned Mileage also varies with the grade of the SupporterCard.
7.Play Progress Information (Information): Displays current information during play, including current calorie consumption, average speed, distance traveled, and playtime. Units other than time can be switched in the settings screen.
8.Play Progress Gauge (Button): If the entire process of the AREA is considered 100%, this gauge format shows how far you have progressed. Like a video gauge, you can touch to move the playback location. Other information includes:
A. Current Location Icon: An icon indicating your current position. Moving it all the way to the right ends the AREA.
B. Progress Gauge: A bar representing the overall progress appears. The far left is the start of the AREA, and the far right is the goal of the AREA.
C. Point Name: The ViewPoint name set in the MiniMap is displayed as an outline name. The content indicated by the name is displayed at this position in the video.
D. Current Time in AREA: Displays the current time on the AREA video data.
E. Current Distance in AREA: Displays how far along you are within the total distance of the AREA video data.
F. Total Time of AREA: Displays the total time of the AREA video data.
G. Total Distance of AREA: Displays the travel distance in the actual location for the AREA video data.
9.Menu (Button): Press to select AREA History, Settings, Suspend, Retry, or Exit.
10. AutoRun (Button): Press to enter AutoRun mode, a mode that continues to play without the need for physical activity.
11. Suspend (Button): Temporarily suspends the current play and returns to the title. When resuming, starting from the title will allow you to resume from the AREA SELECT screen.
12. Pause (Button): Temporarily pauses the play. Play resumes when you restart the activity, touch the screen, or perform some operation.
13.VR Start (Button): Press to start playing in VR mode.
14: Announcement Cut-in: A cut-in that notifies you of the status during communication or in case of communication failure. It is not usually displayed.
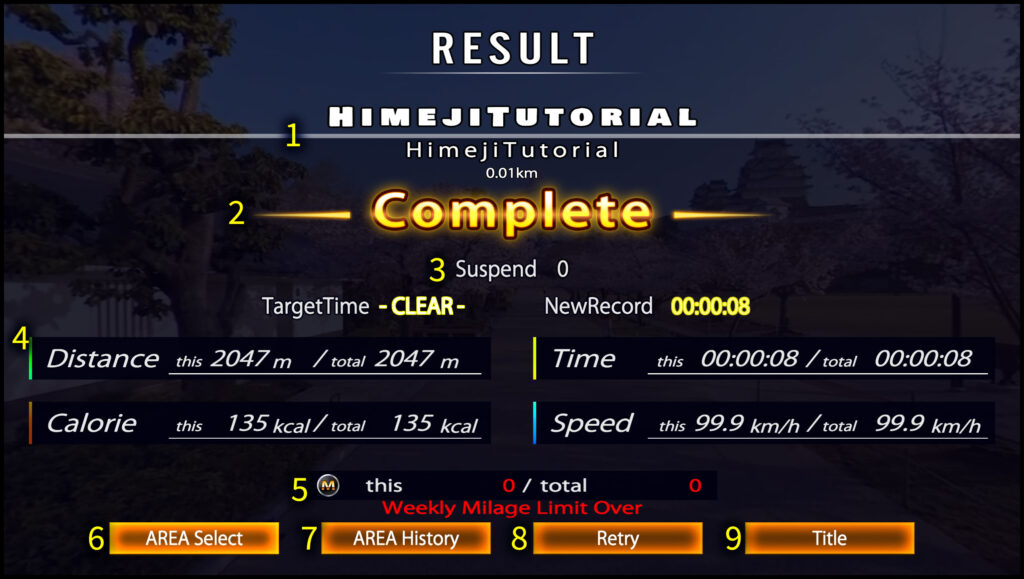
The description corresponding to the number of the image displayed on the AREA Play Result screen is shown below.
About the AREA Play Result Screen
1. Name of AREA (Information): The top shows the name of the AREA (common alphabetical notation), and the bottom shows the name of the AREA (language-specific notation). At the very bottom, the approximate real-world distance set for this AREA’s data is displayed.
2.Clear Judgment: There are three types: Exit, Finish, and Complete. Exit is displayed when the play is ended partway. Finish is displayed when the play is completed to the end but the clear conditions are not met. Complete is displayed when both conditions of finishing within the TargetTime and playing without skips are met.
3.Suspend Count: Shows the number of times the play was temporarily paused (Suspend).
4.Play Completion Information (Information): Displays information at the end of the play, including calories burned, average speed, distance traveled, and playtime. “This” for each item represents the value limited to this play without interruptions, and “total” represents the cumulative value from the start of play to the result screen.
5.Earned Mileage (Information): “This” displays the Mileage earned in this play. “Total” shows the cumulative value including previously owned Mileage. The icon changes according to the grade of the SupporterCard, and the efficiency of earned Mileage also varies with the grade of the SupporterCard.
6.AREA SELECT (Button): Press to return to the AREA SELECT screen. If SNS posting is set, an automatic posting or posting confirmation screen will be displayed.
7.AREA History (Button): Press to display the play history of the AREA played.
8.Retry (Button): Press to play the same AREA again from the beginning. If SNS posting is set, an automatic posting or posting confirmation screen will be displayed.
9. Title (Button): Press to return to the title screen. If SNS posting is set, an automatic posting or posting confirmation screen will be displayed.

